An UltiSnips guide for LaTeX workflows
(This is part two in a seven-part series on efficiently writing LaTeX documents.)
This article covers the Ultisnips snippets plugin with a focus on writing LaTeX documents, and was last modified on 22 December 2025.
You might be interested in this article for two reasons:
- As a standalone guide to writing snippets with the UltiSnips plugin (although the examples in this article are LaTeX-themed, the underlying techniques apply to any language).
- As part two in a seven-part series explaining how to use the Vim or Neovim text editors to efficiently write LaTeX documents.
There is also a LuaSnip version of this article.
Contents of this article
Two ways to read this article
You could either:
- Read the theoretical material first—in this case just keep going and read the article linearly from start to finish.
- Jump directly to examples, then come back and fill in the theory later.
What snippets do
I know what snippets do, next section please.
Just in case it’s your first time hearing about them: snippets are templates of commonly used code (for example the boilerplate code for typical LaTeX environments and commands) inserted into text dynamically using short (e.g. two- or three-character) triggers. Without wishing to overstate the case, good use of snippets is the single most important step in the process of writing LaTeX efficiently and painlessly. Here is a simple example:

Getting started with UltiSnips
This tutorial will use the UltiSnips plugin, which is the most mature out of the menagerie of Vim snippet plugins.
Two notes for Neovim users
-
There is also a LuaSnip version of this article if you prefer.
-
UltiSnips’s support of Neovim is officially “best-effort only”. And while LuaSnip probably does fit better in the Neovim ecosystem, don’t let this discourage you—both I and many other Neovim users have daily driven Ultisnips and Neovim without any issues, and things will probably be fine for you, too.
Installation
Install UltiSnips like any other Vim plugin using your plugin installation method of choice. Because the UltiSnips plugin uses Python…
- you need a working installation of Python 3 on your system (see
:help UltiSnips-requirements) - your Vim must be compiled with the
python3feature enabled—you can test this with:echo has("python3"), which will return1ifpython3is enabled and0otherwise. Note that Neovim comes withpython3enabled by default.
UltiSnips is a snippet engine only and intentionally ships without snippets—you have to write your own or use an existing snippet database.
The canonical source of existing snippets is GitHub user honza’s vim-snippets repository, but even if you use someone else’s snippets, you should probably still know how to write, edit, and otherwise tweak snippets to suit your particular needs instead of blindly copying and pasting.
First steps: snippet trigger and tabstop navigation keys
After installing UltiSnips you should configure…
- the key you use to trigger (expand) snippets, which is set using the global variable
g:UltiSnipsExpandTrigger, - the key you use to move forward through a snippet’s tabstops, which is set using
g:UltiSnipsJumpForwardTrigger, and - the key you use to move backward through a snippet’s tabstops, which is set with
g:UltiSnipsJumpBackwardTrigger.
For orientation, here is an example configuration, which you would place the code in your vimrc or init.vim:
" This code should go in your vimrc or init.vim
let g:UltiSnipsExpandTrigger       = '<Tab>'    " use Tab to expand snippets
let g:UltiSnipsJumpForwardTrigger  = '<Tab>'    " use Tab to move forward through tabstops
let g:UltiSnipsJumpBackwardTrigger = '<S-Tab>'  " use Shift-Tab to move backward through tabstops
Explanation: this code would make the <Tab> key trigger snippets and navigate forward through snippet tabstops (UltiSnips lets you use the same key for both expansion and tabstop navigation), and make the key combination <Shift>+<Tab> navigate backward through tabstops.
(What are tabstops? They’re explained below.)
See :help UltiSnips-trigger-key-mappings for official documentation of trigger keys.
For fine-grained control one can also work directly with functions controlling expand and jump behavior; for more information on this see :help UltiSnips-trigger-functions.
For most users just setting the three global trigger key variables, as in the example above, should suffice.
Where to put snippet files
Just show me some example snippets first.
You store snippets in text files with the .snippets extension.
The file’s base name determines which Vim filetype the snippets apply to.
For example, snippets inside the file tex.snippets would apply to files with filetype=tex.
If you want certain snippets to apply globally to all file types, place these global snippets in the file all.snippets, which is documented towards the bottom of :help UltiSnips-how-snippets-are-loaded.
By default, UltiSnips expects your .snippets files to live in directories called UltiSnips, which, if you wanted, you could place anywhere in your Vim runtimepath.
You can use folder names other than the default UltiSnips, too—the snippet directory name is controlled with the global variable g:UltiSnipsSnippetDirectories.
From :help UltiSnips-how-snippets-are-loaded,
UltiSnips will search each
runtimepathdirectory for the subdirectory names defined ing:UltiSnipsSnippetDirectoriesin the order they are defined.
For example, to use MySnippets as a snippet directory, you would place the following Vimscript in your vimrc or init.vim:
" Use both `UltiSnips` and `MySnippets` as snippet directories
let g:UltiSnipsSnippetDirectories=["UltiSnips", "MySnippets"]
UltiSnips would then load all *.snippets files from all UltiSnips and MySnippets directories in your Vim runtimepath.
Possible optimization: if, like me, you use only a single predefined snippet directory and don’t need UltiSnips to scan your entire runtimepath each time you open Vim (which can slow down Vim’s start-up time), set g:UltiSnipsSnippetDirectories to use a single, absolute path to your snippets directory, for example
let g:UltiSnipsSnippetDirectories=[$HOME.'/.vim/UltiSnips']          " using Vim
let g:UltiSnipsSnippetDirectories=[$HOME.'/.config/nvim/UltiSnips']  " using Neovim
This behavior is documented in :help UltiSnips-how-snippets-are-loaded.
(The . joining $HOME and '/.vim/UltiSnips' is the Vimscript string concatenation operator.)
Snippet folders
You might prefer to further organize filetype-specific snippets into multiple files of their own.
To do so, make a folder named with the target filetype inside your snippets directory.
UltiSnips will then load all .snippets files inside this folder, regardless of their basename.
Again, this behavior is documented in :help UltiSnips-how-snippets-are-loaded.
As a concrete example, a selection of my UltiSnips directory looks like this:
${HOME}/.vim/UltiSnips/          # Vim
${HOME}/.config/nvim/UltiSnips/  # Neovim
├── all.snippets
├── markdown.snippets
├── python.snippets
└── tex
    ├── delimiters.snippets
    ├── environments.snippets
    ├── fonts.snippets
    └── math.snippets
Explanation: I have a lot of tex snippets, so I prefer to further organize them in a dedicated directory, while a single file suffices for all, markdown, and python.
Watch the screencasts!
Quite a few years ago now, Holger Rapp, the author of UltiSnips, created four screencasts demonstrating the plugin’s features:
- Episode 1: What are snippets and do I need them?
- Episode 2: Creating Basic Snippets
- Episode 3: What’s new in version 2.0
- Episode 4: Python Interpolation
They’re old but gold, and pack an impressively thorough demonstration of UltiSnips’s capabilities into about 20 minutes of video. I strongly suggest your watch them—you will find many of the features described in this article covered from a different perspective in the screencasts.
Writing Snippets
If you just want to see some example snippets first, here you go. Otherwise, here is a summary of the snippet-writing process.
Anatomy of an UltiSnips snippet
The general form of an UltiSnips snippet is:
snippet {trigger} ["description" [options]]
{snippet body}
endsnippet
The trigger and snippet body are mandatory, while "description" (which should be enclosed in quotes) and options are optional; options can be included only if a "description" is also provided.
The keywords snippet and endsnippet define the beginning and end of the snippet.
See :help UltiSnips-authoring-snippets for the relevant documentation.
An apology about syntax highlighting
Options
You’ll need to use a few options to get the full UltiSnips experience.
All options are clearly documented at :help UltiSnips-snippet-options, and I’ll summarize here only what is necessary for understanding the snippets that appear later in this document.
Based on my (subjective) experience, with a focus on LaTeX files, here are some good options to know:
-
Aenables automatic expansion, i.e. a snippet with theAoption will expand immediately aftertriggeris typed, without you having to press theg:UltiSnipsExpandTriggerkey. If you’re aiming for real-time LaTeX, using well thought-out automatic snippet expansion will dramatically increase your efficiency—more on this in (subjective) practical tips for fast editing. -
rallows the use of regular expansions in the snippet’s trigger. More on this in the section on regex snippet triggers. -
bexpands snippets only iftriggeris typed at the beginning of a line—this is a useful option when writing snippets for LaTeX environments, which are usually defined at the beginning of a new line. -
i(for “in-word” expansion) expands snippets regardless of wheretriggeris typed. (By default snippets expand only iftriggerbegins a new line or is preceded by whitespace.)
Assorted snippet syntax rules
-
UltiSnips supports comments, which start with
#and can be used to document snippets (see:help UltiSnips-basic-syntaxfor reference). -
According to
:help UltiSnips-character-escaping, the characters',{,$, and\need to be escaped by prepending a backslash\. The actual rules determining which characters must be escaped in which circumstances are a little more subtle (see UltiSnips Issue #1437 for details) and considerably more lenient in practice, so you can often get away with using',{, and\in snippet bodies without escaping them. -
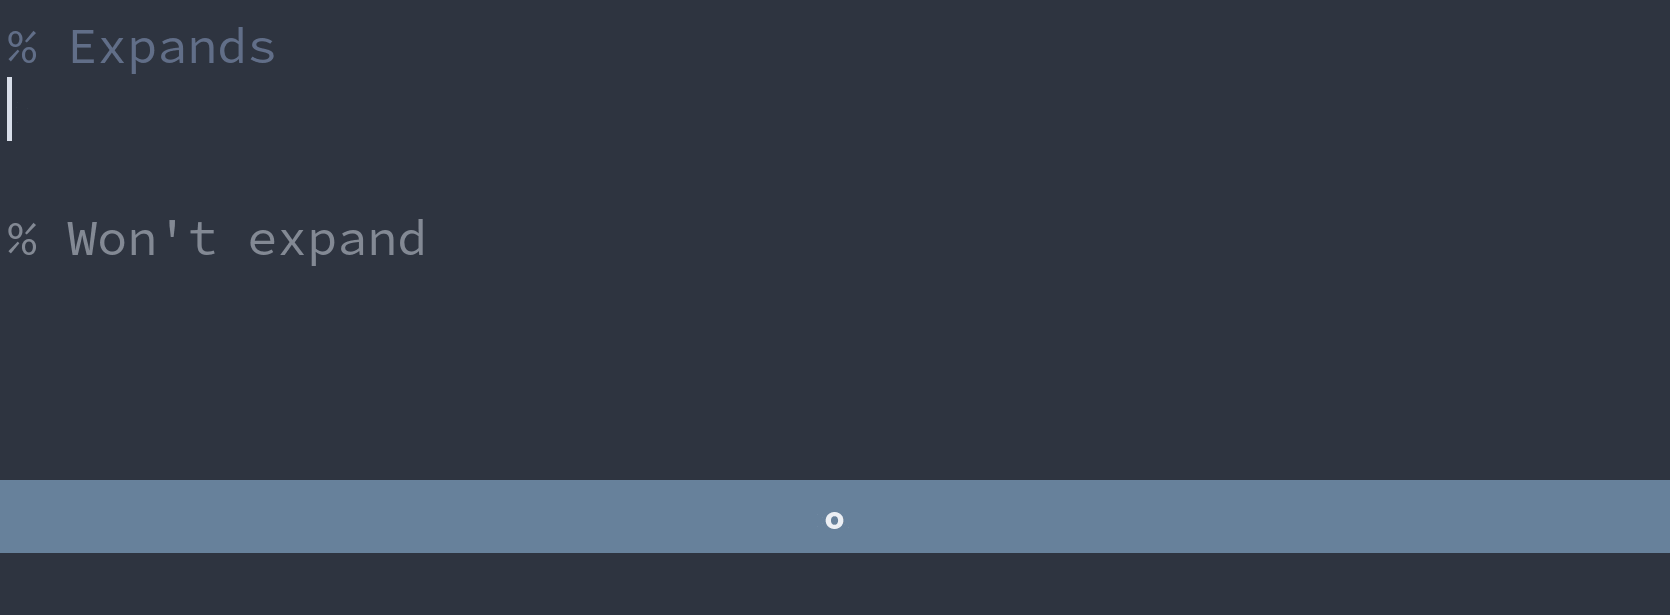
Including the line
extends filetypeanywhere in a
*.snippetsfile will load all snippets fromfiletype.snippetsinto the snippets file containingextends filetype. As an example use case from:help UltiSnips-basic-syntax, you might useextends cinside acpp.snippetsfile, since C++ could use many snippets from C. -
The line
priority {N}, whereNis an integer number (e.g.priority 5), placed anywhere in.snippetsfile on its own line will set the priority of all snippets below that line toN. When multiple snippets have the sametrigger, only the highest-priority snippet is expanded. Usingprioritycan be useful to override global snippets defined inall.snipets. Ifpriorityis not specified anywhere in a file, the implicit value ispriority 0. You can read more about theprioritykeyword in:help UltiSnips-basic-syntax.
Tabstops
Tabstops are predefined positions within a snippet body to which you can move by pressing the key mapped to g:UltiSnipsJumpForwardTrigger.
Tabstops allow you to efficiently navigate through a snippet’s variable content while skipping the positions of static content.
You navigate through tabstops by pressing, in insert mode, the keys mapped to g:UltiSnipsJumpForwardTrigger and g:UltiSnipsJumpBackwardTrigger.
Since that might sound vague, here is an example of jumping through the tabstops for figure path, caption, and label in a LaTeX figure environment:

Paraphrasing from :help UltiSnips-tabstops:
-
You create a tabstop with a dollar sign followed by a number, e.g.
$1or$2. -
Tabstops should start at
$1and proceed in sequential order, i.e.$2,$3, and so on. -
The
$0tabstop is special—it is always the last tabstop in the snippet no matter how many tabstops are defined. If$0is not explicitly defined, the$0tabstop is implicitly placed at the end of the snippet.
As far as I’m aware, this is a similar tabstop syntax to that used in Visual Studio Code.
Some example LaTeX snippets
Here are two examples. (If you’re jumping to here from earlier in the article, you might want to eventually scroll back up and read the theory in between.)
One snippet maps tt to the \texttt command and the other maps ff to the \frac command.
Note that (at least for me) the snippet expands correctly without escaping the \, {, and } characters as suggested in :help UltiSnips-character-escaping (see the second bullet in Assorted snippet syntax rules).
# Snippet for typewriting font
snippet tt "The \texttt{} command for typewriter-style font"
\texttt{$1}$0
endsnippet

# Snippet for fractions
snippet ff "The LaTeX \frac{}{} command"
\frac{$1}{$2}$0
endsnippet
Here are the above \texttt{} and \frac{}{} snippets in action:

Useful: tabstop placeholders
Use placeholders to enrich a tabstop with a description or default text.
The syntax for defining placeholder text is ${1:placeholder}.
Placeholders are documented at :help UltiSnips-placeholders.
Here is a real-world example I used to remind myself the correct order for the URL and display text in the hyperref package’s href command:
# Snippet for inserting named links with href
snippet hr "The hyperref package's \href{}{} command (for url links)"
\href{${1:url}}{${2:display name}}$0
endsnippet
Here is what this snippet looks like in practice:

Useful: mirrored tabstops
Mirrors allow you to reuse a tabstop’s content in multiple locations throughout the snippet body.
In practice, you might use mirrored tabstops for the \begin and \end fields of a LaTeX environment.
Here is an example:

The syntax for mirrored tabstops is what you might intuitively expect: just repeat the tabstop you wish to mirror.
For example, following is the code for the snippet shown in the above GIF; note how the $1 tabstop containing the environment name is mirrored in both the \begin and \end commands:
# Snippet for creating new generic LaTeX environments
snippet env "New LaTeX environment" b
\begin{$1}
    $2
\end{$1}
$0
endsnippet
The b options ensures the snippet only expands at the start of line; see the Options section for review of common UltiSnips options.
Mirrored tabstops are documented at :help UltiSnips-mirrors.
Useful: the visual placeholder
The visual placeholder lets you use text selected in Vim’s visual mode inside the content of a snippet body. Here is the how to use it:
- Create and save an UltiSnips snippet that includes the
${VISUAL}keyword (explained below). - Use Vim to open a file in which you want to trigger the snippet.
- Use Vim’s visual mode to select some text.
- Press the Tab key (or more generally the key stored in the
g:UltiSnipsExpandTriggervariable, which is Tab by default). The selected text is deleted, stored by UltiSnips in memory, and you are placed into Vim’s insert mode. - Type the trigger to expand the previously-written snippet that included the
${VISUAL}keyword. The snippet expands, and the text you had selected in visual mode appears in place of the${VISUAL}keyword in the snippet body.
As an example, here is a snippet for the LaTeX \textit command that uses a visual placeholder to make it easier to surround text in italics:
# Snippet for italic font
snippet tii "The \textit{} command for italic font"
\textit{${1:${VISUAL:}}}$0
endsnippet
And here is what this snippet looks like in action:
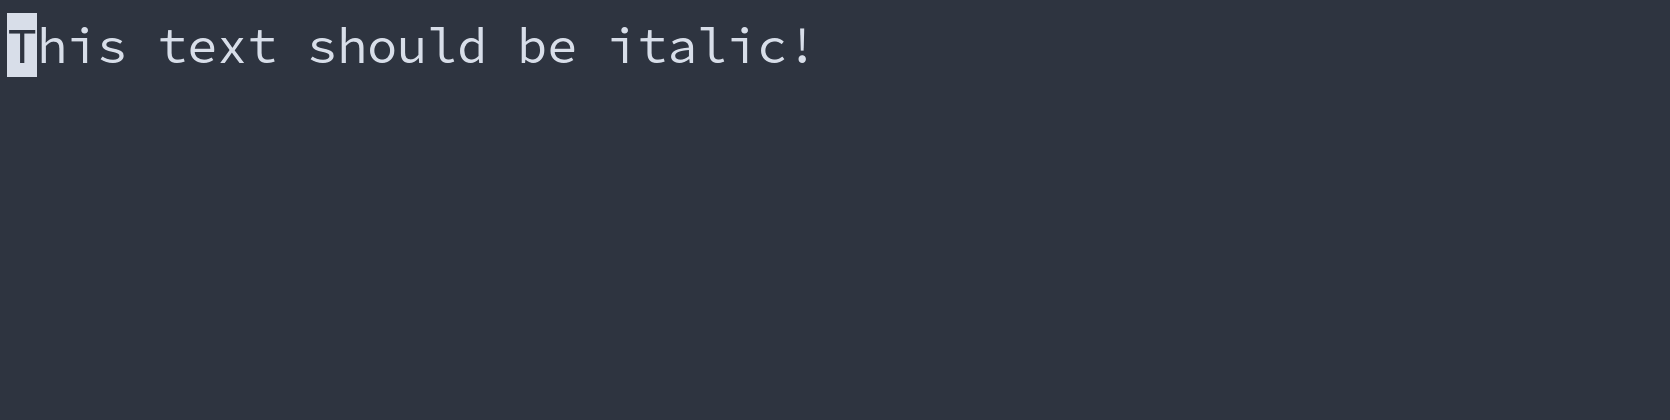
Indeed (as far as I know) the most common use case for the visual placeholder is to quickly surround existing text with a snippet (e.g. to place a sentence inside a LaTeX italics command, to surround a word with quotation marks, surround a paragraph in a LaTeX environment, etc.).
You can have one visual placeholder per snippet, and you specify it with the ${VISUAL} keyword—this keyword is usually (but does not have to be) integrated into tabstops.
Of course, you can still use any snippet that includes the ${VISUAL} keyword without going through the select-and-Tab procedure described above—you just type the snippet trigger and use it like any other snippet.
The visual placeholder is documented at :help UltiSnips-visual-placeholder and explained on video in the UltiSnips screencast Episode 3: What’s new in version 2.0; I encourage you to watch the video for orientation, if needed.
Dynamically-evaluated code inside snippets
It is possible to add dynamically-evaluated code to snippet bodies (UltiSnips calls this “code interpolation”).
Shell script, Vimscript, and Python are all supported.
Interpolation is covered in :help UltiSnips-interpolation and in the UltiSnips screencast Episode 4: Python Interpolation.
I will only cover two examples I subjectively find to be most useful for LaTeX:
- making certain snippets expand only when the trigger is typed in LaTeX math environments, which is called custom context expansion, and
- accessing characters captured by a regular expression trigger’s capture group.
Custom context expansion and VimTeX’s syntax detection
UltiSnips’s custom context features (see :help UltiSnips-custom-context-snippets) give you essentially arbitrary control over when snippets expand, and one very useful LaTeX application is expanding a snippet only if its trigger is typed in a LaTeX math context.
As an example of why this might be useful:
- Problem: good snippet triggers tend to interfere with words typed in regular text.
For example,
ffis a great choice for a\frac{}{}snippet, but you wouldn’t wantffto expand to\frac{}{}in the middle of the word “offer”, for example. - Solution: make
ffexpand to\frac{}{}only in math context, where it won’t conflict with regular text. (Note that thefracexpansion problem can also be solved with a regex snippet trigger, which is covered in the next section.)
You will need GitHub user lervag’s VimTeX plugin for math-context expansion.
(I cover VimTeX in much more detail in the fourth article in this series.)
The VimTeX plugin, among many other things, provides the user with the function vimtex#syntax#in_mathzone(), which returns 1 if the cursor is inside a LaTeX math zone (e.g. between $ $ for inline math, inside an equation environment, etc…) and 0 otherwise.
This function isn’t explicitly mentioned in the VimTeX documentation, but you can find it in the VimTeX source code at vimtex/autoload/vimtex/syntax.vim.
You can integrate VimTeX’s math zone detection with UltiSnips’s context feature as follows:
# Include this code block at the top of a *.snippets file...
# ----------------------------- #
global !p
def math():
  return vim.eval('vimtex#syntax#in_mathzone()') == '1'
endglobal
# ----------------------------- #
# ...then place 'context "math()"' above any snippets you want to expand only in math mode

context "math()"
snippet ff "This \frac{}{} snippet expands only a LaTeX math context"
\frac{$1}{$2}$0
endsnippet
My original source for the implementation of math-context expansion: https://castel.dev/post/lecture-notes-1/#context.
Regex snippet triggers
For our purposes, if you aren’t familiar with them, regular expressions let you (among many other things) implement conditional pattern matching in snippet triggers.
You could use a regular expression trigger, for example, to do something like “make _ expand to a subscript snippet like _{$1}$0, but only if the _ trigger immediately follows an alphanumeric character”.
A formal explanation of regular expressions falls beyond the scope of this article, and I offer the examples below in a “cookbook” style in the hope that you can adapt the ideas to your own use cases. Regex tutorials abound on the internet; if you need a place to start, I recommend Corey Schafer’s tutorial on YouTube.
-
This class of triggers suppresses expansion following alphanumeric text and permits expansion after blank space, punctuation marks, braces and other delimiters, etc.
snippet "([^a-zA-Z])trigger" "Expands if 'trigger' is typed after characters other than a-z or A-Z" r
`!p snip.rv = match.group(1)`snippet body
endsnippet

snippet "(^|[^a-zA-Z])trigger" "Expands on a new line or after characters other than a-z or A-Z" r
`!p snip.rv = match.group(1)`snippet body
endsnippet

# This trigger suppresses numbers, too
snippet "(^|[\W])trigger" "Expands on a new line or after characters other than 0-9, a-z, or A-Z" r
`!p snip.rv = match.group(1)`snippet body
endsnippet
This is by far my most-used class of regex triggers.
Here are some example use cases:
-
Make
mmexpand to$ $(inline math), including on new lines, but not in words like “communication”, “command”, etc…snippet "(^|[^a-zA-Z])mm" "Inline LaTeX math" rA `!p snip.rv = match.group(1)`\$ ${1:${VISUAL:}} \$$0 endsnippetNote that the dollar signs used for the inline math must be escaped (i.e. written
\$instead of just$) to avoid conflict with UltiSnips tabstops, as described in:help UltiSnips-character-escaping. -
Make
eeexpand toe^{}(Euler’s number raised to a power) after spaces,(,{, and other delimiters, but not in words like “see”, “feel”, etc…# Easily insert Euler's number e snippet "([^a-zA-Z])ee" "e^{} supercript" rA `!p snip.rv = match.group(1)`e^{${1:${VISUAL:}}}$0 endsnippet -
Make
ffexpand tofrac{}{}but not in words like “off”, “offer”, etc…# Prevent fraction expansion in words containing "ff" snippet "(^|[^a-zA-Z])ff" "\frac{}{}" rA `!p snip.rv = match.group(1)`\frac{${1:${VISUAL:}}}{$2}$0 endsnippetThe line
`!p snip.rv = match.group(1)`inserts the regex group captured by the trigger parentheses back into the original text. Since that might sound vague, try omitting`!p snip.rv = match.group(1)`from any of the above snippets and seeing what happens—the first character in the snippet trigger disappears after the snippet expands.
-
-
This class of triggers expands only after alphanumerical characters (
\w) or the characters},),], and|.# Expands if 'trigger' is typed after 0-9, a-z, and A-Z snippet "([\w])trigger" "" r `!p snip.rv = match.group(1)`snippet body endsnippet # Of course, modify the }, ), ], and | characters as you wish snippet "([\w]|[\}\)\]\|])trigger" "Expands after 0-9, a-z, A-Z and }, ), ], and |" r `!p snip.rv = match.group(1)`snippet body endsnippet # This trigger suppresses expansion after numbers snippet "([a-zA-Z]|[\}\)\]\|])trigger" "Expands after a-z, A-Z and }, ), ], and |" r `!p snip.rv = match.group(1)`snippet body endsnippetI don’t use this one often, but here is one example I really like. It makes
00expand to the_{0}subscript after letters and closing delimiters, but not in numbers like100:# Quickly insert a zero subscript snippet "([a-zA-Z]|[\}\)\]\|'])00" "Automatic 0 subscript" rA `!p snip.rv = match.group(1)`_{0} endsnippetHere is the above snippet in action:
Combined with math-context expansion, these two classes of regex triggers cover the majority of my use cases and should give you enough to get started writing your own.
Note that you can do much fancier stuff than this.
See the UltiSnips documentation or look through the snippets in vim-snippets for inspiration.
Tip: Refreshing snippets
The function UltiSnips#RefreshSnippets refreshes the snippets in the current Vim instance to reflect the contents of your snippets directory.
Here’s an example use case:
-
Problem: you’re editing
myfile.texin one Vim instance, make some changes totex.snippetsin a separate Vim instance, and want the updates to be immediately available inmyfile.texwithout having to restart Vim. -
Solution: call
UltiSnips#RefreshSnippetsusing:call UltiSnips#RefreshSnippets().
This workflow comes up regularly if you use snippets often, and I suggest writing a key mapping in your vimrc to call the UltiSnips#RefreshSnippets() function, for example
" Use <leader>u in normal mode to refresh UltiSnips snippets
nnoremap <leader>u <Cmd>call UltiSnips#RefreshSnippets()<CR>
In case it looks unfamiliar, the above code snippet is a Vim key mapping, a standard Vim configuration tool described in much more detail in the series’s final article, 7. A Vim Configuration Primer for Filetype-Specific Workflows.
(Subjective) practical tips for fast editing
I’m writing this with math-heavy, real-time university lectures in mind, where speed is crucial; these tips might be overkill for more relaxed use cases. In no particular order, here are some useful tips based on my personal experience:
-
Use automatic completion whenever possible. This technically makes UltiSnips use more computing resources—see the warning in
:help UltiSnips-autotrigger—but I am yet to notice a perceptible slow-down on modern hardware. For example, I regularly use 150+ auto-trigger snippets on a 2.5 GHz, dual-core, third-gen i5 processor and 8 gigabytes of RAM (typical, even modest specs by today’s standards) without any problems. -
Use short snippet triggers. Like one-, two-, or and maybe three-character triggers.
-
Repeated-character triggers offer a good balance between efficiency and good semantics. For example, I use
ff(fraction),mm(inline math), andnn(new equation environment). Althoughfrac,$, andeqnwould be even clearer,ff,mm, andnnstill get the message across and are also much faster to type.Use math-context expansion and regular expressions to free up short, convenient triggers that would otherwise conflict with common words.
-
Use ergonomic triggers on or near the home row. Depending on your capacity to develop muscle memory, you can dramatically improve efficiency if you sacrifice meaningful trigger names for convenient trigger locations. I’m talking weird combinations of home row keys like
j,k,l,s,d, andfthat smoothly roll off your fingers. For example,sd,df,jk, andkl, if you can get used to them, are very convenient to type and also don’t conflict with many words in English or Romance languages.Here are two examples I use all the time:
-
I first define the LaTeX command
\newcommand{\diff}{\ensuremath{\operatorname{d}\!}}in a system-wide preamble file, then access it with the following snippet:# A command I personally use for differentials snippet "([^a-zA-Z0-9])df" "\diff" rA `!p snip.rv = match.group(1)`\diff endsnippetThis
dfsnippet makes typing differentials a breeze, with correct spacing, upright font, and all that. Happily, in this case usingdffor a differential also makes semantic sense.You can see the
\diffsnippet playing a minor supporting role as the differential in this variation of the fundamental theorem of calculus:

As a side note, using a
\diffcommand also makes redefinition of the differential symbol very easy—for example to adapt an article for submission to a journal that uses italic instead of upright differentials, one could just replace\operatorname{d}\!with\,din the command definition instead of rummaging through LaTeX source code changing individual differentials.-
I use the following snippet for upright text in subscripts—the trigger makes no semantic sense, but I got used to it and love it.
# Snippet for math subscripts with upright font
snippet "([\w]|[\}\)\]\|])sd" "Subscript with upright text" rA
`!p snip.rv = match.group(1)`_{\mathrm{${1:${VISUAL:}}}}$0
endsnippet
This snippet triggers after alphanumeric characters and closing delimiters, and includes a visual placeholder.
Please keep in mind: I’m not suggesting you should stop what you’re doing, fire up your Vim config, and start using
sdto trigger upright-text subscripts just like me. The point here is just to get you thinking about using the home-row keys as efficient snippet triggers. Try experimenting for yourself—you might significantly speed up your editing. Or maybe this tip doesn’t work for you, and that’s fine, too.
-
-
Try using
jkas yourg:UltiSnipsJumpForwardTriggerkey, i.e. for moving forward through tabstops. The other obvious choice is the Tab key, but I found the resulting pinky reach away from the home row to be a hindrance in real-time LaTeX editing.Of course
jkis two key presses instead of one, but it rolls of the fingers so quickly that I don’t notice a slowdown. (And you don’t havejkreserved for exiting Vim’s insert mode because you’ve remapped Caps Lock to Escape on a system-wide level and use that to exit insert mode, right?)
Tip: A snippet for writing snippets
The following snippet makes it easier to write more snippets.
To use it, create the file ~/.vim/UltiSnips/snippets.snippets, and inside it paste the following code:
# Make it easier to create new snippets
snippet snip "A snippet for writing Ultisnips snippets" b
`!p snip.rv = "snippet"` ${1:trigger} "${2:Description}" ${3:options}
$4
`!p snip.rv = "endsnippet"`
$0
endsnippet
This will insert a snippet template when you type snip, followed by the snippet trigger key stored in g:UltiSnipsExpandTrigger, at the beginning of a line in a *.snippets file in insert mode.
Here’s what this looks like in practice:

The use of `!p snip.rv = "snippet"` needs some explanation—this uses the UltiSnips Python interpolation feature, described in the section on dynamically-evaluated code inside snippets—to insert the literal string snippet in place of `!p snip.rv = "snippet"`.
The naive implementation would be to write
# THIS SNIPPET WON'T WORK---IT'S JUST FOR EXPLANATION!
snippet snip "A snippet for writing Ultisnips snippets" b
snippet ${1:trigger} "${2:Description}" ${3:options}
$4
endsnippet
$0
endsnippet
…but this would make the UltiSnips parser think that the line snippet ${1:trigger}... starts a new snippet definition, when the goal is to insert the literal string snippet ${1:trigger}... into another file.
In any case, this problem is specific to using the string snippet inside a snippet, and most snippets are much easier to write than this.
Finding this tutorial series useful? Consider saying thank you!
The original writing and media in this series is licensed under the Creative Commons Attribution-NonCommercial-ShareAlike 4.0 International License.